 1.Start by applying the base coat.
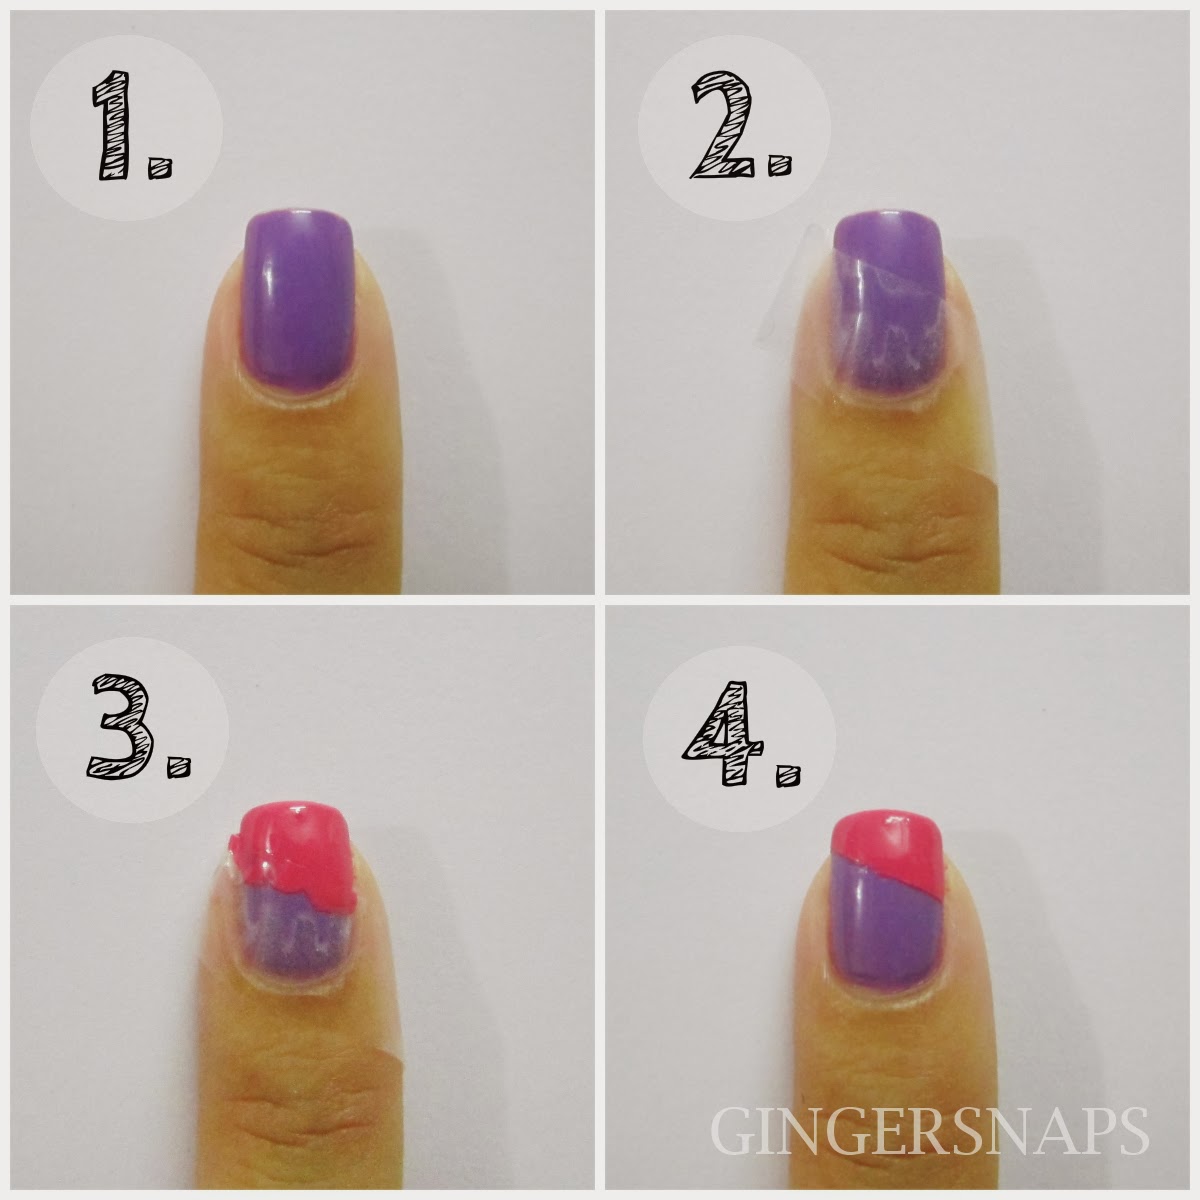
2.After your base coat completely dries, apply tape along the nail for the desired design. I am going for a basic diagonal one.
3.Now apply a contrasting nail paint to the exposed part of the nail.
4.Remove the tape slowly while the nail paint is still wet. Apply top coat to diminish imperfections.
Tips:
- Wait for the base coat to dry completely before starting with the scotch tape part. Or you can even do this tape mani on second day nails.
- Take off some extra stickiness of the tape by putting it on the back of your hand (or anywhere really) so that it does not peel of the base coat.
- Make sure that you have applied the tape firmly to your nail so there are no gaps left. You do not want the polish of the second layer to run underneath the tape.
- For the second layer, it is best to use a polish that would do the job in one coat.
I have used 'Faces: Grape Escape' and 'Sally Hansen Xtreme Wear: 405 Coral Reef' (reviewed here) to create this look.
I had actually trashed the idea of doing this post because I did not like how the pictures had come. While going through my picture archives today, I thought, well the pictures are not that bad. And now after completing the post, I am glad I am putting this up. This is such a simple yet pretty nail art design. You can do so many basic and intricate nail art designs using tape, the possibilities are endless! If you try out this nail design, do share it with me on Facebook, Twitter or Instagram.
Previous Nail Art Post: DIY: Easy Nail Art for Beginners - Polka Dots
Karishma
xoxo
xoxo
I just love this idea <3
ReplyDeleteGlad you liked it Gowthami!
Deleteu won't believe but i am wearing a similar mani in light pink and navy blue.. did it albeit the scotch tape :) same pinch... and pretty colors u have chosen :)
ReplyDeleteReally? Do share the pics if you can :)
DeleteLove this pretty pink and purple together, looks so girly and thanks for this excellent tutorial.
ReplyDeleteGreat idea for beginner, so easy and cute <3
ReplyDeleteThis really cute , simple and thnx for sharing it
ReplyDeleteCool idea !
ReplyDeletethats super easy!!
ReplyDeleteI also did this mani at a recent fet together but i chose diff colors...very simple to do and yet looks pretty! love the color u chose!
ReplyDeleteAwesome Tut Dear :) .. Easy and Attractive <3
ReplyDeleteNice!!
ReplyDeletepretty color combo...loved the mani :) made it sound so simple to do..
ReplyDeleteI'm glad you decided to put this up doll :D Love it.. Muuahh..
ReplyDeleteeasy peasy!! and still so chic :) loved it
ReplyDeleteVery simple and looks fun.
ReplyDeleteHey Karishma :D Love how you've explained this so well :D
ReplyDeleteAlot of my nail art tutorials use this technique! its the absolute base of nail art! Love the colors you've used! Veryy pretty :*
http://www.fashhunny.blogspot.in/
Such a great idea. Thanks for sharing.
ReplyDeleteBeautetude
This is one of my favorite and easiest manis to do! Loved it xx
ReplyDeleteThis is really nice and fun :)
ReplyDeleteThank you :)
Thanks for stopping by sweety!
ReplyDeleteLove this...... it is so easy..... and perfect for beginners.....lol
ReplyDeleteLooks great...... it is perfect for beginners.....lol
ReplyDeleteGreat for beginners and looks very pretty.
ReplyDeleteA person like me really appreciates this! Thanks!
ReplyDeletehttp://longdistancecollegelove.blogspot.in/
So this is how to do this kind of mani. I will def try it out. I never knew that this was so easy. Thanks for the tutorial.
ReplyDeleteThis Idea is so cool! ^_^
ReplyDeletekisses!
the-glamorous-diva@blogspot.in
I did this once with two different shades of pink. :)
ReplyDeleteThis idea is great for beginners like me 😊surely gonna try today itself
ReplyDelete